Part 2 of the Blog Series: Cloudy with a Chance of VMs: Scaling Up & Out with Azure explains how to configure an Azure Load Balancer and compares Manual VM scaling to Auto-Scaling via Azure Scale Sets.
Backend Pool configuration
Cloud Computing shines in a cost-benefit analysis; virtually unlimited resources are available at a moment’s notice, and resources must only be paid for if and when they are needed. Unlike dedicated servers, Cloud-based resources scale quickly & automatically to respond to peak loads. They can also provide fault tolerance via replication both within and between data centers.
Auto Scale Sets vs. Manual Availability Sets
As described in Part 1 of this blog series, despite the power of Azure’s WebApp solutions, a real-world application often needs the support of a good, old-fashioned server. For example, Azure Web Apps and Web Jobs do not support:
- Custom Ports: only port 80 is supported
- Non-HTTP Networking: protocols like UDP (uni-directional) network protocol
If a single premium-tier VM can’t handle peak load, an Azure Load Balancer can delegate to a pool of VMs.
Two main options exist when scaling-out pools of Azure VMs:
- Auto-scaled Azure Scale Sets of generalized VM images behind a built-in Load Balancer
- Manually-scaled Availability Sets of specialized VM images: an Azure Load Balancer must be manually created & configured
Each of these options has its own pros & cons, but a few simple rules-of-thumb apply:
- Auto Scale Sets are harder to get right, especially for highly-customized VMs.
- However, once they are working, Scale Sets are more efficient and much more easily scaled: either manually or automatically
- Scale Sets provide their own Load Balancing: the name of the Scale Set determines the base of the Sets’ FQDN (domain name)
- Manually-scaled Availability Sets of specialized VM images are easier to roll out
- This is especially true when you need a pool of highly-specialized, custom VMs
- However, once an Availability Set is configured, it requires manual effort to scale out each VM and auto-scaling is not available.
- Availability Sets require a separate Load Balancer, but this allows you to configure specialized load-balancing rules & custom ports
Auto-scaled Sets of VMs spun up from a generalized VM disk image
You can create an Azure Scale Sets of either standard (stock) VMs or from a custom VM image. It can be quite a challenge to generalize a custom VM image, since it must automatically spawn in a usable state to be auto-scaled correctly. Once you have customized your VM as desired, the following steps are recommended:
- Backup your VM image (create a copy in a separate storage location, since Azure won’t let you rename it)
- Warning! Be sure to backup your VM image before generalizing it
- Use the Sysprep utility to generalize the custom VM image
- This will allow it to be used in a Scale Set, but you can no longer run the VM from the original VM disk image.
Once you’ve got your VM image ready, this Azure tutorial explains how to create a Virtual Machine Scale Set with the Azure portal. These Azure docs provide a more general overview of further options available via command-line Powershell command-lets. For example, Connecting to a VM in a Scale Set can be quite tricky. You can:
- configure a scale set to automatically assign public IP addresses to new VMs
- use NAT rules to let you connect to the nodes of the scale set
- create a jumpbox (intermediary) in the same virtual network as the scale set
Manually-scaled Availability Sets of VMs cloned from a specialized VM disk image
In the simplest case (presented in Part 1 of this blog series), a single VM can be cloned from a specialized VM image into the existing Availability Set targeted by a custom-configured Azure Load Balancer.
- !!! Create the new VM in the Availability Set of the Load Balancer
I.e., You cannot reconfigure the Availability Set after VM creation - Upon creation, manually add the VM to the Backend Pool of the Load Balancer
I.e., Membership in an Availability Set does not automatically add a VM to a Load Balancer’s Backend Pool - See Azure documentation for details of VM creation from a .vhd (stored) Image
Azure Load Balancer configuration
Load Balancer configuration in Azure, while fairly well-documented, can be confusing due to the many types of load balancer (interal vs. internet-facing) and configuration tools available: Azure Portal, command-line (CLI) and ARM templates.
This blog explains how to use the Azure Portal to configure a public-facing, internet IP addressed load-balancer to provide restricted access to a Backend Pool of VMs providing custom TCP/UDP services as per the offical Azure documentation.
Similar documents descsribe many other methods (e.g., ARM) and types (e.g., internal) of load balancer configuration provided by Azure:
- Public-facing Load Balancer configuration with ARM & Powershell
- Internal Load Balancer configuration in Azure Portal
Frontend IP configuration
This is the easy part: Create a static or dynamic public IP address or chose an existing one.
Health Probe configuration
A Health Probe allows a Load Balancer’s rules to determine the health of each node in An Availability or Scale Set. The Load Balancer targets only the subset of healthy nodes.
The default TCP or HTTP probes allow probe interval & failure count to be configured. You can also create a custom probe.
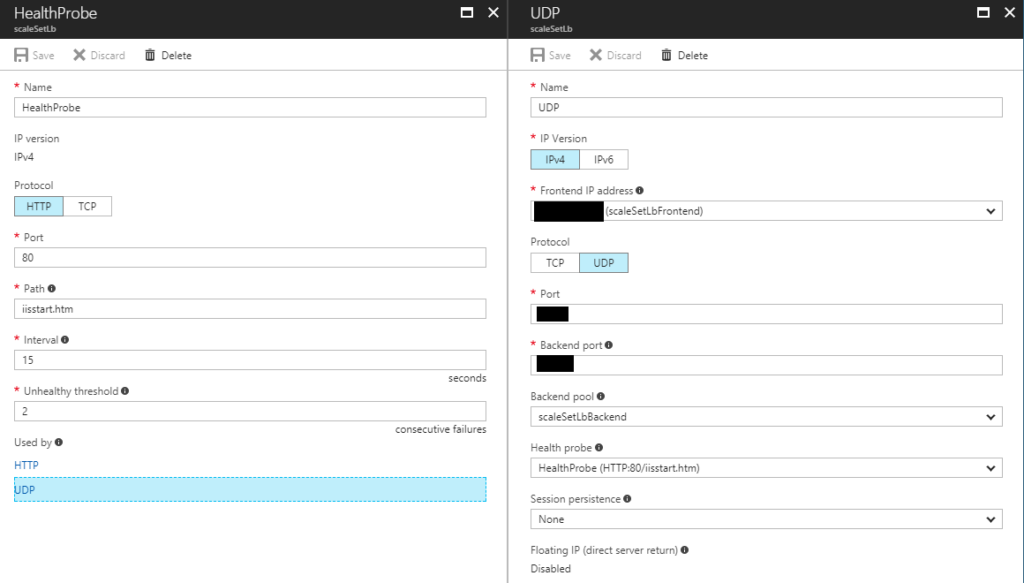
health probe configuration
Load Balancing rule configuration
Load Balancing rules work much like NAT rules: they map a TCP or UDP request from a front-end port to a back-end port. In addition, the Load Balancer rule also specifies:
- Backend Pool: defines the set of all VMs that are available as potential targets of the Load Balancer rule
- Health Probe: determines the subset of available VMs that are healthy and can thus serve as targets in the Backend Pool
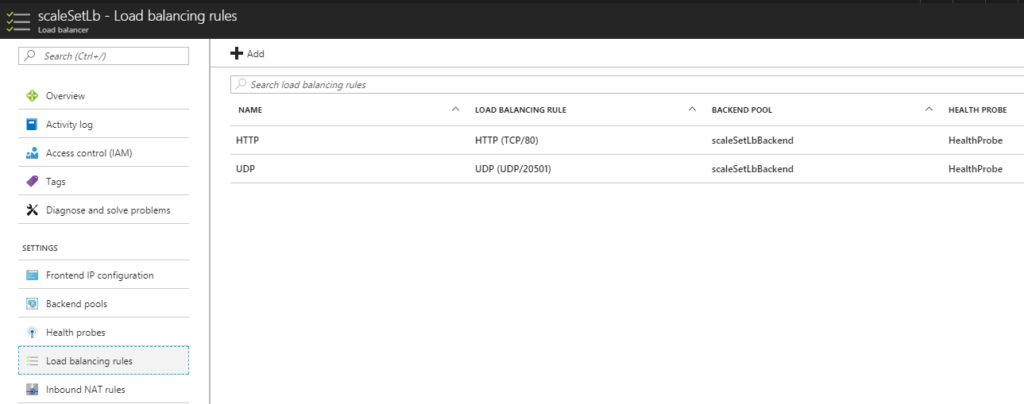
configure Load Balancing Rules
Once your Load Balancer is running, you can enable Diagnostics settings to steam logs to storage, events or Log Analytics with Alerts, Health Probe status and custom metrics.
Summary
Auto Scale Sets & Availability Sets of Azure VMs each have their pros & cons. Once the multitude of options are better understood, Azure VMs can be customized to scale out legacy applications or auto-scaled off-the-shelf to support the latest trends such as Azure’s new Ethereum Consortium Blockchain solution template, which will be the topic of a future blog: Blockchaining the Ether: Mine Your Own Cryptocurrency in Azure.