Several times we’ve worked on projects in the pro audio/music instrument industries that have used a very useful C++ cross-platform application framework called ‘JUCE‘. It was originally developed as part of the ‘Tracktion‘ digital audio workstation, and later extracted out as a standalone framework (in much the same way that Ruby on Rails was extracted from 37 Signals’ work on Basecamp). For open source projects, JUCE is licensed under the GPL, and for commercial projects it’s licensed under a very reasonable per-company license (not per-project, or per-year). Applications written using the framework can be deployed on Windows, OS X, Linux, iOS, and Android.
For audio developers, it’s an incredibly useful framework that contains solid and well-conceived classes to deal with many of the lower-level tasks that any application processing audio will need to deal with — opening and configuring multichannel audio devices (which may involve dealing with numerous different driver stacks), finding and loading audio effects plug-ins (again — several different formats exist in the wild, including VST and Apple’s AudioUnits), accepting and generating MIDI data, implementing audio effects algorithms, reading and writing audio files, and so on.
I’ve worked on a few projects that used JUCE, but was never involved in any of the work that touched that audio layer. I’ve been considering writing the next version of a long-standing personal music software system over to JUCE, and after spending some time poring over the documentation and sample code, I decided that it would be best for my sanity to start with a smaller project as a learning experience, and document what I learned as I go.
JUCE comes with good class-level documentation and a set of very useful sample apps (as well as full source for JUCE itself), but there’s not much in the way of "here are the important things that you need to know to become productive." After a few weeks of poring through the sample code and Doxygen output, I’m hoping that this series of posts will act as the document that I wish had existed.
The Incline to The Scumbler
For decades, I’ve been a fan of the music of guitarist Robert Fripp. Throughout his career, he’s done a series of solo performances (originally referred to as ‘Frippertronics’, later rechristened ‘Soundscapes’) that consist of him performing over live loops of his own playing. Originally, he implemented this using a pair of reel-to-reel tape recorders with a single long loop of tape strung between both of them, then transitioning to a rack of digital delays and effects as those tools became available. In 2010, I took my son into Manhattan to hear what Fripp says will be his final Soundscapes performance ever.
http://www.spinner.com/2010/12/03/robert-fripp-soundscapes-live/
http://www.wnyc.org/shows/newsounds/2010/dec/22/
http://www.youtube.com/watch?v=JftuGnzGx20
(He’s far from the only person to use similar techniques — guitarist David Torn explores similar ideas in much of his work, and there are many other musicians around the world also working in this area — see http://www.loopers-delight.com/loop.html)
For this project, I decided that it was a reasonably-scoped project to build a pure software system that:
- Works with professional grade multichannel audio I/O hardware
- Runs on both Mac OS and Windows (…and eventually iOS, I hope)
- Can loop multiple independent tracks of audio
- Can process audio using VST or AU plugins.
I’m calling this system ‘The Scumbler’ — partly because it’s a name that I can be safe that no marketing guy is ever going to try to use, and partly because it describes what the program will do very well. "Scumble" is a term from art for covering a painted area with a layer of semi-opaque paint to soften the colors or outlines, and that’s a lot like what we’ll end up doing.
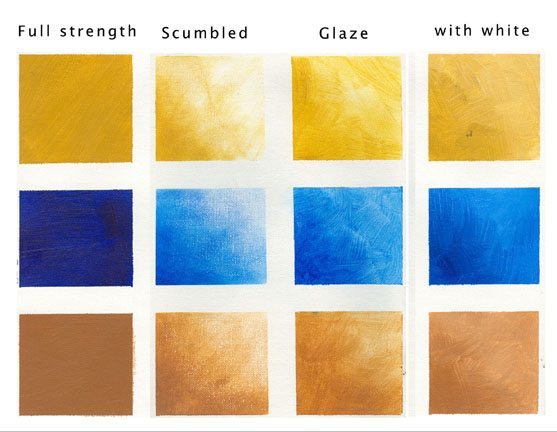
(source http://www.jessbates.com/pages_tutorials/glazing_scumble.htm)
Source for this project will be made available on github at some point — you can check at https://github.com/bgporter
Instructions for getting JUCE itself are available at http://www.rawmaterialsoftware.com/downloads.php
Step 1: Do No Harm
The first step is to gain enough understanding of the audio subsystems that I can
- Instantiate an audio device
- Change its configuration
- Persist that configuration to and from disk
- Instantiate input and output connections on the audio device
- Connect the input and output for a simple audio passthrough
Luckily, much of this is found already in the JUCE Audio Plugin Host example program that comes with the JUCE distribution. The downside is that there’s also a lot of other stuff in there that makes it difficult to understand exactly how the various pieces need to fit together unless you spend a lot of time with the source. This project is fallout from my spelunking through the JUCE sample apps and using what I learn along the way. I expect that as we go along, my understanding of things will change and I’ll have opportunities to go back and rework things to accomodate my updated knowledge.
The major pieces that we need to be aware of are a combination of concrete classes supplied with JUCE that can be used directly and base classes that your code will need to use for derived classes specific to your application.
AudioDeviceManager
http://www.rawmaterialsoftware.com/juce/api/classAudioDeviceManager.html
Your application should have a single instance of the AudioDeviceManager class.This object is used to encapsulate all of the pertinent audio and midi hardware that’s available on the system that’s running your app. JUCE provides built in auxiliary classes and UI code to select and configure these devices, as well as persisting that configuration between runs of the program.
For audio to start flowing, you need to pass this object a pointer to another object that implements the AudioIODeviceCallback interface.
Once your code adds that callback to the device manager, it will be called repeatedly with buffers of audio and midi data that need to be processed.
AudioProcessor
http://www.rawmaterialsoftware.com/juce/api/classAudioProcessor.html
Classes derived from the AudioProcessor base class are used (as you might guess) to process audio and MIDI data. This class includes a lot of member functions, but the key one is:
virtual void processBlock (AudioSampleBuffer &buffer, MidiBuffer &midiMessages);
…which is called each time a block of samples and/or MIDI data need to be handled. Each processor replaces the contents of the buffer and MIDI Messages objects passed to it by reference.
AudioProcessorGraph
http://www.rawmaterialsoftware.com/juce/api/classAudioProcessorGraph.html
A single audio processor on its own probably isn’t too interesting in any app, and certainly not in this one. JUCE’s AudioProcessorGraph is-a AudioProcessor that holds a bunch of other AudioProcessor objects and can connect their outputs and inputs in arbitrary topologies. This is where the real fun lies (and if you have some time on your hand, I really recommend sitting down with a glass of brandy and the source code for this class sometime — it’s some really nice and complex code that rewards the time spent studying it).
Audio flows into the graph on one side, gets processed by all of the processor nodes owned by the graph, and the processed audio flows out the graph on the other side.
AudioProcessorPlayer
http://www.rawmaterialsoftware.com/juce/api/classAudioProcessorPlayer.html
JUCE provides this class to glue together the AudioDeviceManager and the AudioProcessorGraph. It is-a AudioIODeviceCallback object, and can be passed to the AudioDeviceManager for your app to start handling audio samples, and it has-a AudioProcessor. Create an instance of AudioProcessorGraph, pass it to the AudioProcessorPlayer::setProcessor() function, and then start adding AudioProcessors to the graph.
AudioProcessorGraph::AudioGraphIOProcessor
http://www.rawmaterialsoftware.com/juce/api/classAudioProcessorGraph_1_1AudioGraphIOProcessor.htm
More classes provided for us by JUCE — you can instantiate this class as one of a special set of input or output nodes that take care of putting audio input into your processor graph or sending the audio output from your graph back to the outside world.
A little bit of code…
Some of this code was lifted more-or-less verbatim from the sample app "Audio Plugin Host", and in some cases, I used that as a model that I’ve veered away from. Modulo a few minor tweaks, the code follows the coding conventions documented here.
In my MainWindow.h file (originally created by the Introjucer app that comes with JUCE to get a JUCE project started, including creating XCode/MSVC project files), I have an instance of AudioDeviceManager:
/**
 * The Audio devices are owned by the application window. We pass a reference
 * to this object to the Scumbler object that needs to use it. This lets us
 * keep concerns like configuring & persisting state of the underlying system
 * out of the model for this app.
 */
 AudioDeviceManager      fDeviceManager;
…and in the .cpp file, we initialize it, including trying to load any previous settings from the application’s properties file:
// restore anything we saved in previous instantiations.
   PropertiesFile* userSettings = gAppProperties->getUserSettings();
   ScopedPointer savedAudioState(userSettings->getXmlValue("audioDeviceState"));
   fDeviceManager.initialise(2, 2, // max 2 input and output channels.
    savedAudioState,              // pass in the last known configuration state
    true                          // select the default device if restoring the last config fails.
    );
Everything else interesting happens inside an instance of my app’s Scumbler object. This object gets a reference to the AudioDeviceManager at construction time, and owns its own instances of AudioProcessorPlayer and AudioProcessorGraph:
/**
 * The player object that pushes audio through the filter graph.
 */
 AudioProcessorPlayer fPlayer;
/**
 * The graph of audio processors that do all the work.
 */
 AudioProcessorGraph  fGraph;
/**
 * The audio hardware.
 * In our initial version, we'll just initialize with defaults, and use
 * the Juce-supplied AudioDeviceSelectorComponent class to let the user tweak
 * settings.
 */
 AudioDeviceManager&   fDeviceManager;
When we start up that Scumbler object, we create input and output nodes and add them to the graph, then connect them together. In the constructor we do this:
fPlayer.setProcessor(&fGraph);
 fDeviceManager.addAudioCallback(&fPlayer);
 this->Reset();
and some other interesting member functions:
void Scumbler::Reset()
 {
    // clear out the processor graph
    fGraph.clear();
    // Create and add new input/output processor nodes.
AudioProcessorGraph::AudioGraphIOProcessor* in =
new AudioProcessorGraph::AudioGraphIOProcessor(
AudioProcessorGraph::AudioGraphIOProcessor::audioInputNode);
fInputNode = this->AddProcessor(in);
AudioProcessorGraph::AudioGraphIOProcessor* out =
    new AudioProcessorGraph::AudioGraphIOProcessor(
    AudioProcessorGraph::AudioGraphIOProcessor::audioOutputNode);
    fOutputNode = this->AddProcessor(out);
this->Connect(fInputNode, fOutputNode);
}
(where Scumbler::Connect() is a member function that does what you’d think, but is a little more dense than might be appropriate to show here. It connects the output of the input node to the input of the output node.)
At this point, our Scumbler app is what I would call version 0.1.0 — it doesn’t do anything particularly interesting, perhaps, but we:
- open the desired audio I/O device
- create a graph of processors that we’ll soon enough be able to insert any audio processing plug-in that’s available on the user’s machine
- passes audio through the graph to the output.
In part 2, we’ll deal with finding, loading, connecting, and modifying VST and AU plugins.