In my last blog post I had just discovered the Meteor JavaScript-based web application platform. I have had a little more time to play with it and I am still having a lot of fun with it. On a personal project I was working on, I needed to add user accounts. The support for Accounts in the Meteor platform has left me incredibly impressed. Various accounts packages allow for the addition of account handling on the backend and on the user interface with minimal effort. Adding in support for popular authentication methods (such as Google, Facebook, Twitter, etc.) consists of adding a new accounts package.
To demonstrate, I’m going to take the simple chat application that I built in the Meteor Introduction post and extend it to use accounts instead of using a simple text input to specify the message user.
The full source for this application is available on github.
First, we need to add the accounts package for username/password. At the terminal in the folder for the project, enter:
meteor add accounts-password
The "accounts-base" package, which handles creation of the database information and basic account interaction structures.
At this point the structures exist for creating and accessing accounts. You could add in all of the code for to let users create accounts, log in, and log out but there’s a much easier way. The "accounts-ui" package adds a turn-key interface for working with accounts:
meteor add accounts-ui
This provides our application with the ability to add account access directly to our template/html code. The first thing we’ll want to do is change our html to include {{loginButtons}} at the top of the body.
Refresh and voilà!
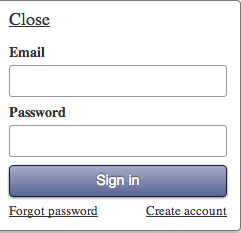
Clicking on the "Sign in" link gives us an log-in screen. Clicking on "Create account" lets users create an account by providing an email and password. Let’s say we don’t want to require an email. The documentation for accounts-ui shows some config options to set that. We’ll just add some configuration to our client code in testapp.js.
Accounts.ui.config({
   passwordSignupFields: 'USERNAME_ONLY'
});
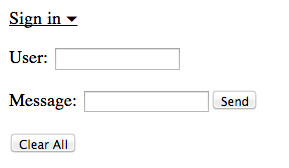
Now, instead of an email address, a username is all that’s required:

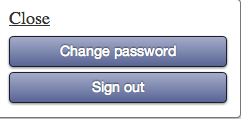
After signing in, the account username is displayed instead of "sign in" and when clicked shows a different dialog with account options for the user:
The next step is to take out our previous “User” text input and disallow the user from posting unless the user is logged in. In our body, we’ll just put a handlebars conditional around the rendering of the “input” template.
{{loginButtons}}
 {{#if currentUser}}
 {{> input}}
 {{/if}}
 {{> entries}}
Since we previously added a "Clear" button to remove all the messages, we’ll want to wrap that as well. Now our "entries" template looks like this:
<template name="entries">
    {{#each entries}}
       <strong>{{name}}:</strong> {{message}}<br>
    {{/each}}
    {{#if currentUser}}
       <p><input type="button" id="clear" value="Clear All"/>
    {{/if}}
</template>
Now the user will just see the conversation messages but can’t add to the conversation. Since we removed the "User" input, we’ll need to take out the references to it in sendMessage handler. We’ll replace any references with our new account info. First in the “Submit” handler. Notice that I’ve changed “name” on the Entries db to “user”. We’ll pull the name out from the user in the “entries” template. Our ‘input’ template handler now looks like this:
    // create events for the 'input' template
    Template.input.events = {
        // map the event (click) for the control for the given selector
        'click input#sendMessage': function (event) {
            var user = Meteor.user();
            if (!user) {
                return;
            }
            var message = document.getElementById('message');
        if (message.value != '') {
            // add the entry to the list of entries
            Entries.insert({
                user: user,
                message: message.value,
                time: Date.now()
            });
           document.getElementById('message').value = '';
            message.value = '';
        }
    }
}
And our “entries” template looks like this:
<template name="entries">
    {{#each entries}}
       <strong>{{user.username}}:</strong> {{message}}<br>
    {{/each}}
    {{#if currentUser}}
        <p><input type="button" id="clear" value="Clear All"/>
    {{/if}}
</template>
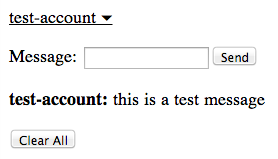
And that’s it! If you create an account and submit a message, we see our new message with the username pulled from the account.
Just like before, users can go to the site from multiple places and see updates to the messages dynamically as they are created in the database.
I haven’t gone back and counted the actual line changes here but I would estimate that we’ve added user account capabilities in under 10 lines of code. That’s simply astounding.
Further
This example shows a very simple username/password account system. In my own application I actually added login capabilities for Google and Facebook and the process was exactly the same. I simply added the packages "accounts-google" and "accounts-facebook". When I clicked the "Sign in" link again I was prompted to configure the account information for those authentication interfaces. There are manual options for configuring these as well using the Accounts.config settings.
Obviously this is a very simple example. After working with the Meteor accounts in other projects, I’ve found the Meteor accounts architecture to be very well-thought-out and, for the most part, transparent.