Sometimes it’s a very thin line between following the Don’t Repeat Yourself credo and the Don’t Go Off On Unnecessary Tangents requirement. When I find myself going through the same processes again and again, I can’t help but wonder as I mindlessly go through the motions, the same steps I’ve taken many times before, how could I save time here? Is the time I’d save worth the time I’d spend up front? Is it practical, and would it help other developers on the same – or another – project?
Programming with Yii Framework over the last couple of years has been a blast. When I began, I had little experience with MVC frameworks; I’d tried Zend for personal projects, but considered it to have too much bloat for my applications. I knew from using Symfony and Django (Python) that there were better ways of working with database objects, but I hadn’t picked a favorite. While Yii is much more difficult to pick up and use to construct a personal site than, say, using no framework at all, it encourages (and at times, demands) better practices. One of those practices is reusing components and widgets, everywhere you can and wherever it makes sense. At the end of the day you will have a flexible foundation that Future You can build upon without trying to remember why you made the decision to combine business logic and design and validation in the same file, duplicated for various purposes, none of which make sense to you now. Ah, like a space chimp exiting the emergency hatch for what appears to be a banana, I digress.
Automatic code generation was introduced in Yii 1.0.8 as a yiic shell feature. Basically, you’d go into a Yii-specific shell prompt and give it text commands to generate models, controllers and CRUD. In the same commands you’d tell it where to put those objects and what to base them on. In practice it worked fine, but I remember thinking it wasn’t very flexible.
Yii 1.1.2 introduced a module named Gii (rhymes with "Yee") that took code generation to the web and made it fully customizable. Now you could have templates and options for using those templates, or you could roll your own generators.
Please make sure you have Yii 1.1.2 or newer before proceeding. As of this post, the latest stable version is 1.1.13, released Dec 30, 2012.
In this article I’ll show you how to custom tailor the model generator (by way of templating) to add getter and setter helper methods for your database table’s columns. After that I’ll show you how to create a new type of generator for creating console commands on the fly. It’s my hope that by the time we’re done here, you’ll have a better understanding of how Yii’s automatic code generation can save you time, and from repeating yourself.
Setting up Gii
Before we can begin, make sure you have enabled Gii in your Yii application. Navigating directly to http://hostname/path/to/index.php?r=gii should be enough to find out.
If Gii is not enabled, do so by editing your protected/config/main.php:
In the "Modules" section, add:
'gii'=>array(
        'class'=>'system.gii.GiiModule',
    'password'=>'secret',
    // 'ipFilters'=>array('127.0.0.1', '192.168.1.10'),
    // 'newFileMode'=>0666,
    // 'newDirMode'=>0777,
    'generatorPaths'=>array(
    'application.gii'
         ),
      ),
In the urlManager options within "Components" section, add the rules in blue:
        'urlFormat'=>'path',
         'showScriptName'=>false,
         'rules'=>array(
            'gii'=>'gii',
    'gii/<controller:w+>'=>'gii/<controller>',
'gii/<controller:w+>/<action:w+>'=>'gii/<controller>/<action>',
Now you should be able to access the Gii module at http://hostname/path/to/index.php?r=gii or http://hostname/gii if you have pretty URLs enabled. At this point, and if you haven’t already, I’d encourage you to generate some models based on your database tables, just to see how the output looks.
Customizing Gii’s Model Generation
The "generatorPaths" option we added to the configuration specifies where Gii can find our custom templates and generators. For a vanilla installation, this directory won’t exist, so create it. (application.gii translates to Web/protected/gii).
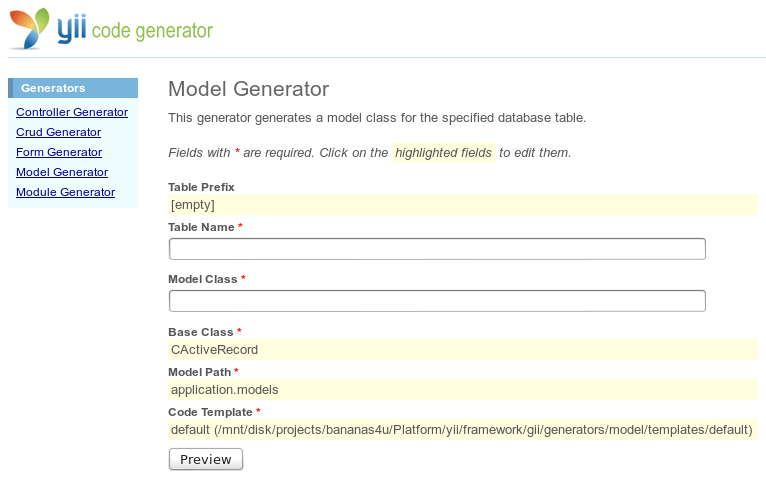
Looking at the Model Generator page, you’ll see the Code Template is set to default, and is derived from Yii Framework source. The path to this standard template will be different on your installation; the bananas4u project is top-secret and full of things you don’t have, and probably don’t want.
Now, if you were to click that yellow-shaded line ("default ..[snip]"), as with the others above, it transforms into a form input, in this case a dropdown. If you had other templates present they would appear here. So let’s make one.
In application.gii (Web/protected/gii) create the folder model, and inside it, another folder templates. Inside that, create a third folder named however you’d like to represent this template. Here I’m calling it MyModel.
At this point you’ll be missing the model.php (the meat of the template), so find the default one from the framework (path displayed in previous screenshot) and copy it here. Now we’re ready to modify our new template. Open it in your favorite editor.
The first thing you’ll notice is that this is basically a view, except instead of web content, it contains all of the code necessary to output a PHP file, in this case a model representation of a database table. Being that this is a copy of the default model, you’re free to use a heavy hand here to clean things up how you like.
It’s a topic of contention whether model properties with underscores in their names should be accessed via $model->field_name or $model->fieldName, but as I favor the latter, I’m going to add a small bit of code at the bottom of the new template that will create getter and setter methods for database columns containing underscores, so a column named "display_name" can be retrieved via $model->displayName and set via$model->displayName = "";.
If you weren’t using a model generator template, you might find yourself just adding this in by hand:
function getDisplayName()
{
   return $this->display_name;
}
function setDisplayName($v)
{
   $this->display_name = $v;
}
Being that I want this in every model I create, I’d much prefer the code generation process take care of it for me. Add this next bit to the bottom of your model template, before the last closing curly bracket (the one that effectively ends the model class):
<?php
$fCamelFunc = create_function('$c', 'return strtoupper($c[1]);');
foreach ($columns as $name=>$column)
{
   if (preg_match('/._./', $name))
   {
      $camelName = $name;
      $camelName[0] = strtoupper($camelName[0]);
  echo "   public function get" . preg_replace_callback('/_([a-z])/', $fCamelFunc, $camelName) . "()n";
  echo "   {n";
  echo "      return $this->{$name};n";
  echo "   }nn";
  echo "   public function set" . preg_replace_callback('/_([a-z])/', $fCamelFunc, $camelName) . "($v)n";
  echo "   {n";
  echo "      $this->{$name} = $v;n";
  echo "   }nn";
}
}
?>
Don’t worry about breaking anything, this is just a model template, and the point is to experiment.
Building a new console command Code Generator
It can be very useful to have command-line tools for a custom Yii application for the purpose of calendaring execution, data repair or other seldom-used cases where you don’t need or want to build a set of controller actions and views to do something via the web. Generally, creating a console command for a Yii application follows this process:
- Create a console command class by hand, extending CConsoleCommand
- Add console command class reference to Web/protected/config/console.php
- Run yiic, specifying as argument the name you gave the command to test that it works
Today it’s typical for console commands to be stored and created in application.commands (Web/protected/commands) but you can place them wherever you wish – I use application.extensions just by habit.
While creating a single console command isn’t very complicated, creating them from scratch (or from an existing command) becomes tedious over time, and often repetitive not just in the motions but also in the content. Let’s say you have three types of console commands:
- Informative – polls and aggregates data in order to show useful info
- Immediately Destructive – modifies or deletes database objects
- Informative/Destructive – summarizes data to be modified until a confirmation flag is passed
Here it makes sense to derive all three from a common class, that class derived from CConsoleCommand – this way you have a single place for utility methods. Then you could probably split the three types into two subclasses, non-destructive vs. destructive. You might end up with class stubs you copy and paste before writing the meat of a console command. Even so, this can become very repetitive. Why not let Gii do a lot of the work for us?
File structure for our Generator
Although I’m using application.gii (Web/protected/gii), you could place these elsewhere- just be sure to update the generatorPaths in the Gii section of the main configuration file (see "Setting up Gii" above). If you do put this in a different location, you may need to update a few references to application.gii.command.

CommandGenerator.phpis the Code Generator.CommandCode.phpis the Code Model.templates/default/command.phpis the basic template that will ship with our generator.views/index.phpcontains the presentation HTML and JavaScript necessary to render our Gii generator’s webpage.views/config-add.phpwill be used after generating a console command to display the PHP code we need to add to our console configuration file.
The source code for this generator is released under the Apache 2.0 license. If you prefer to follow along in your editor of choice, the source can be downloaded from the gii-command-generator extension on the Yii extensions site.
Create the Generator
Code generators extend from the base Yii class CCodeGenerator. Our generator class is simple and only needs to define the code model required.
Web/protected/gii/command/CommandGenerator.php:
<?php
class CommandGenerator extends CCodeGenerator
{
   public $codeModel = 'application.gii.command.CommandCode';
   public $pageTitle = 'Console Command';
}
As soon as you name this file CommandGenerator.php, Gii should pick up on it and display a new option on the Gii landing page.

Note that although you see it listed, clicking on it would result in an error as we haven’t created all of the required files yet.
Create the Code Model
Code models extend from the base Yii class CCodeModel and work with user supplied data to generate custom code.
Web/protected/gii/command/CommandCode.php:
<?php
class CommandCode extends CCodeModel
{
   public $command;
   public $className;
   public $baseClassName = 'CConsoleCommand';
   public $scriptPath='application.extensions';
// Prefix and case options only affect the JavaScript
   // automatic class naming.
   public $classPrefix = 'A';   // Prefix class, so "run-test"
                                // becomes "aRunTestCommand"
   public $classUcFirst = true; // Keep first letter capitalized,
                                // e.g. "ARunTestCommand"
public function attributeLabels()
   {
      return array(
         'command'         => 'Command',
         'className'       => 'Class Name',
         'baseClassName'   => 'Base Class',
         'scriptPath'      => 'Script Path',
      );
   }
public function rules()
   {
      return array_merge(parent::rules(), array(
         array('command, className, baseClassName',
          'required'),
         array('command', 'match',
            'pattern'=>'/^([a-zA-Z0-9_-])+$/',
          'message'=>'{attribute} is restricted to a-z, A-Z, 0-9, '
            . '_ and -.'),
         array('className, baseClassName', 'match',
            'pattern'=>'/^w+$/',
            'message'=>'{attribute} should only contain word characters.'),
         array('baseClassName', 'sticky'),
         array('scriptPath', 'validateScriptPath'),
         array('scriptPath', 'sticky'),
      ));
   }
public function validateScriptPath($attribute,$params)
   {
      if ($this->hasErrors('scriptPath'))
      {
         return;
      }
  if (Yii::getPathOfAlias($this->scriptPath) === false)
  {
     $this->addError('scriptPath',
        'Script path must be a valid path alias.');
  }
}
public function prepare()
   {
      $basePathAlias = $this->scriptPath . '.' . $this->command;
      $classPath = Yii::getPathOfAlias($basePathAlias
         . '.' . $this->className) . '.php';
  $code = $this->render($this->templatePath
     . PATH_SEPARATOR . 'command.php');
  $this->files[] = new CCodeFile($classPath, $code);
}
public function successMessage()
   {
      $path = Yii::getPathOfAlias(
         'application.gii.command.views.config-add');
  return $this->render($path.'.php', array(
    'command'=>$this->command,
    'className'=>$this->className,
    'scriptPath'=>$this->scriptPath));
}
}
Note that the code model is setting the default base class to use. If you were to subclass CConsoleCommand you could change the default to be your own class instead. If that were the case, you’d also want to add it as an option in the generator view below so you could select it.
Create the Default Template
Here we define the standard template for new console commands.
Web/protected/gii/command/templates/default/command.php:
<?php echo "<?phpn"; ?>
class <?php echo $this->className; ?> extends
<?php echo $this->className."n"; ?>
{
   public function getHelp()
   {
       return <?php echo "<<<"; >EOD
USAGE
DESCRIPTION
EOD;
   }
public function run($args)
   {
}
}
Create the Views
Generator view
Our generator view will use a CCodeForm widget to lay out available options in the web interface for creating new console commands. Here, $model refers to our Code Model. You may notice the inline validation and error output – we can use this because CCodeForm inherits from Yii’s CActiveForm class.
Web/protected/gii/command/views/index.php:
<h1>Console Command Generator</h1>
<?php $form = $this->beginWidget('CCodeForm',
  array('model'=>$model)); ?>
    <div class='row' >
        <?php echo $form->labelEx($model, 'command'); ?>
        <?php echo $form->textField($model, 'command',
          array('size'=>45)); ?>
        <div class='tooltip'>
            Command must only contain word characters and hyphens
        </div>
   <?php echo $form->error($model, 'command'); ?>
</div>
<div class='row' >
    <?php echo $form->labelEx($model, 'className'); ?>
    <?php echo $form->textField($model, 'className',
     array('size'=>45,'readonly'=>'readonly')); ?>
    <div class='tooltip'>
        Class name must only contain word characters
    </div>
    <?php echo CHtml::checkBox('autoClassName', true,
      array('id'=>'autoClassName')); ?> Auto
    <?php echo $form->error($model, 'className'); ?>
</div>
<div class="row sticky">
    <?php echo $form->labelEx($model,'scriptPath'); ?>
    <?php echo $form->textField($model,'scriptPath',
      array('size'=>45)); ?>
    <div class="tooltip">
This refers to the directory that contains your console commands. It should be specified in the form of a path alias, for example, application.commands or application.extensions.
</div>
    <?php echo $form->error($model,'scriptPath'); ?>
</div>
<div class='row template sticky'>
    <?php echo $form->labelEx($model, 'baseClassName'); ?>
    <?php echo $form->dropDownList($model, 'baseClassName',
       array(
        'CConsoleCommand'=>'CConsoleCommand',
    )); ?>
</div>
<?php $this->endWidget(); ?>
<script type="text/javascript">
function dashToCamel(str) {
   return str.replace(/W+(.)/g, function (x, chr) {
      return chr.toUpperCase();
   });
}
(function($){
   var autoSet = true;
   var prefix = <?php echo CJSON::encode($model->classPrefix); ?>;
   var ucFirst = <?php echo CJSON::encode($model->classUcFirst); ?>;
var $commandName = $('#CommandCode_command'),
       $className = $('#CommandCode_className'),
       $autoToggle = $('#autoClassName');
$commandName.bind('keyup keypress blur', function() {
      if (autoSet)
      {
         var dashPrefix = (prefix ? prefix + '-' : '');
         var camelSet = dashToCamel(dashPrefix+$commandName.val()+'Command');
         if (ucFirst)
         {
            var f = camelSet.charAt(0).toUpperCase();
            camelSet = f + camelSet.substr(1);
         }
         $className.val(camelSet);
      }
   });
$autoToggle.click(function() {
      autoSet = this.checked == true;
  if (autoSet)
  {
     $className.attr('readonly', 'readonly');
     $commandName.trigger('blur');
  }
  else
  {
     $className.removeAttr('readonly');
  }
});
})(jQuery);
</script>
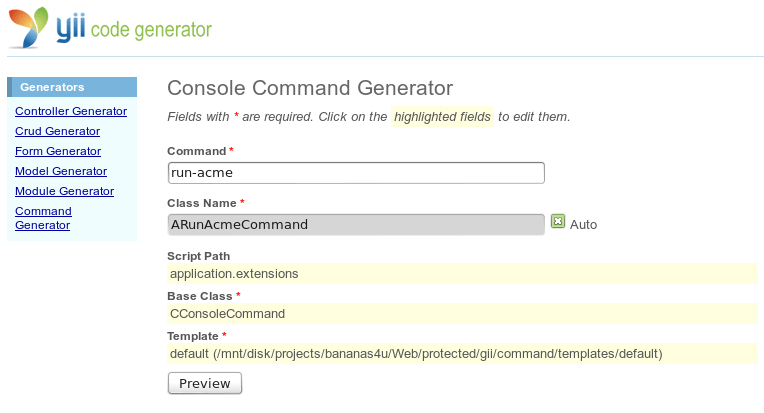
The inline JavaScript is there to turn the command name "run-acme" into "ARunAcmeCommand". You can of course override this if you want by toggling the "Auto" checkbox, but I find it’s useful for my own naming scheme. Of course, I’d expect you to use a heavy hand here, too, and make it work exactly how you want it to. After all, the idea is to save you time!
Config helper view
After generating a new console command, we could manually enter in the necessary path to it in our configuration file. Here, we construct the chunk of config necessary for our command, and we’ll render it after code generation so we can just copy and paste it into the configuration file.
Web/protected/gii/command/views/config-add.php:
<?php echo <<<EOF
The console command has been generated.
<br><br>
You may add the following to
<strong>protected/config/console.php</strong>'s
<em>commandMap</em> to activate it:
<br><br>
<code>
'$command' => array(<br>
<nobr> 'class' => '$scriptPath.$command.$className',</nobr>
<br>
),<br>
</code>
EOF;
Seeing it in action

Upon previewing and confirming console command generation, you should see a nice success message:

After adding the new lines to your console configuration you should be able to run your brand new console command via yiic.
Now that you’ve seen how easy it is to customize Yii code generators, the question is put to you, dear reader: will implementing your own code generators save you time in the long run, or just serve as a geeky distraction from real work?


